In our previous posts we have discussed
Image inversion and
Gradient. Today we will discuss about masking. We will also conclude
Reflection example provided by Apple. Source code of our example is available at
github. Please feel free to modify or test this code on your machine.
Image Masking:
I believe we are all familiar with the idea of bit masking. In bit masking we change bits in input data to on, off or invert by applying bit operators. For example if input bits are 0110 and if we apply OR bit operator on this data using some mask such as 1111 then the result of this operation would be 1111. Similarly in Image mask we apply a mask on a given image to switch on, off or modify part of the image. In iOS there are different techniques to mask an image.
- Masking using an image mask.
- Masking using an image.
- Masking using colors.
- Masking using Context clip.
In Apple reflection example context clip masking is used to display reflected image.
Masking using an image mask
A bitmap image mask contains sample values (S) at each point corresponding to an image. Each sample value is represented through 1, 2, 4 or 8 bits per components and it specifies the amount that the current fill color is masked at each location in the image.
Lets take an example to understand image masking. Suppose we have an image of a bus and we only want to display part of it. To obtain this, we mask bus image with an image mask as shown in figure 1:
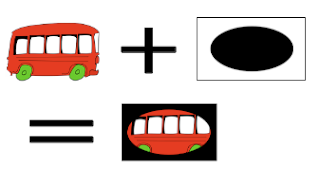 |
| Figure1: Bus image is masked with image mask. (a)original image (b) image mask (c) masked image. |


