Thursday, 14 November 2013

Cassandra Data Modelling - Tables


In this series of posts I will discuss the basic concepts of data modelling in Apache Cassandra. It is important to understand those concepts as it will help us to design an efficient system using Cassandra. In this post I will discuss basic concept called tables in Cassandra.

I am assuming that you have installed Cassandra 1.2 or above with CQL3. You can download Cassandra from Apache Cassandra website. CQL 3.0 is the language which helps to work with Cassandra object same as SQL language helps to works with SQL objects.

Thursday, 12 April 2012

d-touch Mobile- Part 3

In our last two posts we discussed about d-touch markers and how d-touch mobile library can be configured and used in an Android application. In this post we are going to discuss the architecture of the d-touch mobile library.

There are three main entities or classes of the d-touch mobile library.
  1. HIPreference
  2. DetectMarker
  3. MarkerConstraint
The sequence diagram of these entities is shown in figure 1:

Figure 1: Sequence diagram of d-touch mobile library

Wednesday, 11 April 2012

d-touch Mobile - Part 2

In our last post we discussed a brief introduction of  d-touch markers.In this post we will see how to use d-touch mobile library in an Android project. The output of our sample project would look like as shown in picture 1. You can find the library in DtouchMobile folder and the sample code in DtouchSample1 folder on the github.
Picture 1: Sample camera preview with marker detection window.

Thursday, 5 April 2012

d-touch Mobile - Part 1

d-touch markers are visual markers which are easy to design and easy to communicate to humans. Enrico Costanza has introduced these markers and has launched a dedicated d-touch website for this project. d-touch markers can be used in mixed reality application. As part of the research project for Horizon Digital Economy Research Institute, University of Nottingham , I have developed a d-touch library for Android system. In this post I will give an introduction of the d-touch markers. In our next post I will show how to create a sample application using d-touch mobile library. The library and sample source code is available on the github. Please feel free to use this for building cool projects! Here are few example outputs of the sample code in DtouchSample folder on the github.

Youtube marker
Youtube dtouch marker

Friday, 8 July 2011

UIImageView curl shadow effect using shadowPath

In my last post I discussed how to display UIImageView with border and shadow. One important thing to consider while displaying shadow is performance. This can be improved by explicitly specifying shadow path property in CALayer class. According to iOS CALayer class reference documentation "Specifying an explicit path usually improves rendering performance".  If shadowPath property is not defined then the shadow is created using layers composited alpha channel. In this post we will see how to create curl shadow effect using shadowPath property. The output of our image will look like as shown in figure 1.
Figure1: (a) original photo (b) photo with border and curl shadow

Sunday, 19 June 2011

UIImageView with border and shadow

In iPhone or iPad applications we sometimes need to display images or photos with borders and shadows around them. There are few ways to achieve this but generally I tend to use UIImageView. There are few reasons why I prefer this solution. First according to iOS documentation, UIImageView is optimized to display images. Second it is less lines of code. I will discuss how we can convert image as shown in figure 1 to image with border and shadow in figure 2. Once you understand the basic concept of drawing borders and shadows I would invite you to read my next post: UIImageView curl shadow effect using shadowPath. This post discusses how to render shadows efficiently.

Figure1: image without border.
Figure 2: image with white border and a shadow.

Friday, 10 June 2011

Understanding the Image Reflection - Masking

In our previous posts we have discussed Image inversion and Gradient. Today we will discuss about masking. We will also conclude Reflection example provided by Apple. Source code of our example is available at github. Please feel free to modify or test this code on your machine.

Image Masking:
I believe we are all familiar with the idea of bit masking. In bit masking we change bits in input data to on, off or invert by applying bit operators. For example if input bits are 0110 and if we apply OR bit operator on this data using some mask such as 1111 then the result of this operation would be 1111. Similarly in Image mask we apply a mask on a given image to switch on, off or modify part of the image. In iOS there are different techniques to mask an image.
  1. Masking using an image mask.
  2. Masking using an image.
  3. Masking using colors.
  4. Masking using Context clip.
In Apple reflection example context clip masking is used to display reflected image.

Masking using an image mask
A bitmap image mask contains sample values (S) at each point corresponding to an image. Each sample value is represented through 1, 2, 4 or 8 bits per components and it specifies the amount that the current fill color is masked at each location in the image.
Lets take an example to understand image masking. Suppose we have an image of a bus and we only want to display part of it. To obtain this, we mask bus image with an image mask as shown in figure 1:
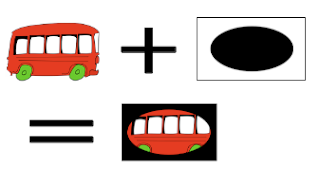
Figure1: Bus image is masked with image mask. (a)original image (b) image mask (c) masked image.