In our last post we discussed a brief introduction of
d-touch markers.In this post we will see how to use d-touch mobile library in an Android project. The output of our sample project would look like as shown in picture 1. You can find the library in DtouchMobile folder and the sample code in DtouchSample1 folder on the
github.
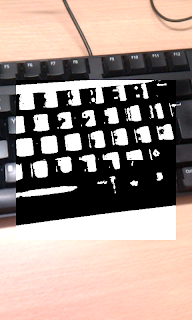 |
Picture 1: Sample camera preview with marker detection window.
|
Here are the steps to implement an Android project using d-touch mobile library.
OpenCV
d-touch mobile library uses
OpenCV to read images and detect regions.
OpenCV is widely used in many computer vision applications. Therefore if you are interested in this field then it is worth to look at and use this library. On OpenCV website, search for Android and it will take you to the OpenCV for Android website. This website contains detail steps to install OpenCV for Android on your machine.
d-touch Mobile library
Download d-touch library
source code from the github. In Eclipse right click on DtouchMobile project and click properties. Select Android menu and it will display Project Build Target and Reference section. In the Reference section click add and select OpenCV library which you have downloaded.
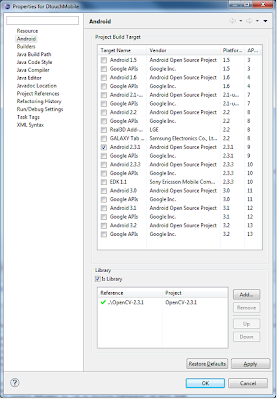 |
| Picture 2: Select OpenCV library |
Create Android Project
We will now create a sample application which uses d-touch mobile library. Before creating this project please make sure that both OpenCV and DtouchMobile projects compile successfully. Create a new Android project and name it DtouchSample1 as shown below.
 |
| Picture 3: Android Sample project. |
Add d-touch mobile library in your code by clicking project properties and then add a reference to the library.
HIPreference
This class is used to define the default preferences which are used by the DtouchMobile library to detect the d-touch markers. If you would like to override the preferences then one option is to create your own class which extends HIPreference class. In this case we have created a class called PreferenceSample1. This overrides default parameters such as min & max number of branches, empty branches, leaves and modulo. Copy PreferenceSample1 class from the sample project DtouchSample1 on
github and copy it into your project. The other option to override preferences is to call set functions on HIPreference class such as setDefaultMinBranches and so on.
HISurfaceViewBase and HIMarkerSurfaceView
SurfaceView class in the Android framework provides a drawing surface inside a view hierarchy. It is very useful to preview camera output. HISurfaceViewBase extends from the SurfaceView class and implements the SurfaceHolder.Callback interface. This interface is useful to receive the notifications about changes in the camera surface. The most important functions are surfaceCreated, surfaceChanged and surfaceDestroyed. We start marker detection processing when surfaceCreated is called and stop marker detection processing when surface is destroyed. HIMarkerSurfaceView implements marker specific processing. Copy HISurfaceViewBase and HIMarkerSurfaceView files from DtouchSample1 project and copy it into your project. There are two functions in HIMarkerSurfaceView where we call DtouchMobile library. First is initData function where we initialise MarkerDetector object.
    @Override
    protected void initData(){
     releaseData();

     synchronized (this) {
            // initialise Mats before usage
            mGray = new Mat();
            mRgba = new Mat();
            mMarkerImage = new Mat();
            mComponents = new ArrayList<mat>();
            mHierarchy = new Mat();
        }

     markerDetector = new MarkerDetector(this.getContext(), new PreferenceSample1(this.getContext()));
     mMarkerDetected = false;
    }
This function creates the MarkerDetector object and initialises it with the activity context and PreferenceSample1 class. The second point where we call the markerDetector object is when a region is detected and we want to test if the detected region is a d-touch marker. It is called from the findMarkers function.
   private boolean findMarkers(Mat imgMat, DtouchMarker marker){
     boolean markerFound = false;
     Mat contourImg = imgMat.clone();
     //Find blobs using connect component.
     Imgproc.findContours(contourImg, mComponents, mHierarchy, Imgproc.RETR_TREE, Imgproc.CHAIN_APPROX_NONE);
     //No need to use contourImg so release it.
     contourImg.release();

     List<integer> code = new ArrayList<integer>();

     for (int i = 0; i < mComponents.size(); i++){
      //clean this list.
      code.clear();
      if (markerDetector.verifyRoot(i, mComponents.get(i), mHierarchy,imgMat,code)){
       //if marker found.
       marker.setCode(code);
       //marker.setComponent(mComponents.get(i));
       marker.setComponentIndex(i);
       markerFound = true;
       break;
      }
  }
     return markerFound;
    }
This function calls the OpenCV findContours function to detect regions. These regions are then returned in Components and Hierarchy parameters of this function. We use components and hierarchy parameters to check if it is valid region by calling verifyRoot function of markerDetector object.
HICameraActivity & markerCamera.xml
We have included surfaceView in our project by copying HISurfaceViewBase and HISurfaceView. Now we will need to setup an activity which uses this surface. HICameraActivity is a simple activity class which creates surface view by using markerCamera.xml as its layout. Copy HICameraActivity.java from the sample project into the default package of our current project. Also copy markerCamera.xml from the res/layout folder from the sample project into current projects res/layout folder. Please make sure that there is a correct path for surfaceView control in the markerCamera.xml file. The path is referenced in the class property of html tag view. For example our markerCamera.xml file looks like as follows:
<?xml version="1.0" encoding="utf-8"?>
<LinearLayout android:id="@+id/MarkerLayout"
 android:layout_width="fill_parent" android:layout_height="fill_parent"
 xmlns:android="http://schemas.android.com/apk/res/android">
 <FrameLayout android:layout_height="wrap_content" android:layout_width="wrap_content"
  android:id="@+id/frameLayout">
 <view class="uk.test.dtouchSample1.HIMarkerSurfaceView"
  android:id="@+id/MarkerSurfaceView"
  android:layout_width="wrap_content"
  android:layout_height="wrap_content"/>
 </FrameLayout>
</LinearLayout>
In this case the class property in the view tag has value uk.test.dtouchSample1.HIMarkerSurfaceView as HIMarkerSurfaceView class resides in the uk.test.dtouchSample1 package.
AndroidManifest.xml
Open AndroidManifest.xml file and update activity to HICameraActivity and also add camera permission into your file. Here is how your manifest file might looks like:
<?xml version="1.0" encoding="utf-8"?>
<manifest xmlns:android="http://schemas.android.com/apk/res/android"
      package="uk.test.dtouchSample1"
      android:versionCode="1"
      android:versionName="1.0">
    <uses-sdk android:minSdkVersion="9" />
    <application android:icon="@drawable/icon" android:label="@string/app_name">
         <activity android:name=".HICameraActivity"
                  android:label="@string/app_name"
                  android:screenOrientation="landscape" android:configChanges="keyboardHidden|orientation">
            <intent-filter>
                <action android:name="android.intent.action.MAIN" />
                <category android:name="android.intent.category.LAUNCHER" />
            </intent-filter>
        </activity>
    </application>
    <uses-permission android:name="android.permission.CAMERA" />
 <uses-feature android:name="android.hardware.camera" />
 <uses-feature android:name="android.hardware.camera.autofocus" />
</manifest>
At this stage the program should compile successfully. Run this program and you should be able to see full camera surface with the central region detecting the markers.
|
| Picture 4: Sample camera preview with marker detection window. |
Now point your mobile to one of the sample markers. These markers are available in DtouchSampleImages folder on
github.
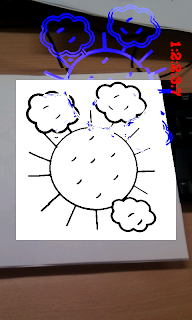 |
| Picture 5: Marker detection. |
You can see in picture 5 that the marker has been detected by the application. It shows d-touch marker code with the shape of the detected marker.


No comments:
Post a Comment